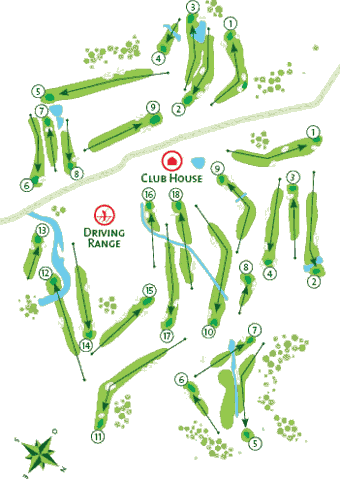
Hole 1 (Par 4)
407
391
362
An interesting opening hole. The fairway bends slightly to the left so players aiming to the right should be aware of the large right hand bunker. Equally a strong shot from the tee trying to cut the left corner will also find a line of waiting bunkers. The generous green has an upward slope and a defending front right bunker.
Hole 2 (Par 4)
388
368
326
From the tee the line is to the right of the fairway as there are bunkers strategically placed on the left side of the fairway. The approach shot is to carry the defending water hazard and land on an up-sloping green. Many players lay-up short so as to have a good chance of landing on the green and making a par.
Hole 3 (Par 4)
306
294
233
This hole only presents a problem on the approach shot as there are two front defending bunkers left and right to a green without much depth.
Hole 4 (Par 4)
353
332
282
On the tee it is important to consider the water hazard cutting across the fairway in the landing area. On the approach shot it may be advisable to lay up as the limited green is very well defended by bunkers to the left and right.
Hole 5 (Par 5)
451
418
387
This hole will be challenging to many players. The tee drive should keep the line to the left side of the fairway as bunkers and a water hazard await on the right. This water hazard continues diagonally across the fairway to feed a lake which defends the green. The second shot is to carry this water to the landing area to the right of the green for a comfortable approach to a split level green. Beware, there is a bunker to the rear of the green.
Hole 6 (Par 3)
176
158
128
It is essential to place the ball on the green as it is well defended by three bunkers placed front, left and right with run-off slopes on all sides. An Out of Bounds runs up the left side of the hole.
Hole 7 (Par 4)
310
269
235
The tee drive is to a generous landing area but bordered by a water hazard crossing the fairway and also a small lake to the left side. The approach shot is to a long generous green but with bunkers to the front right and a run-off slope to the left.
Hole 8 (Par 3)
171
155
115
Accuracy from the tee is required on this hole as the green present several questions. There are three front defending bunkers catching anything short and there are run-off slopes to the left and the back of the green.
Hole 9 (Par 4)
352
336
325
The hole is a challenging dogleg to the left. The line of the tee shot should be to the centre of the fairway as there are a line of bunkers to the left and a large bunker on the right. The approach shot is to a raised two level narrow long green with three front defending bunkers.
Hole 10 (Par 5)
498
485
425
A long dogleg right hole. Accuracy from the tee will be to land on the narrow fairway with a bunker to the right. The second shot must clear the water hazard running across the fairway in order to have a good approach shot to a tightly defended small green surrounded by bunkers.
Hole 11 (Par 5)
494
439
407
A strong accurate tee drive is down a narrow tree lined fairway to the dogleg left so the best line is to right side aiming to pass the bunker and large tree. An equally strong second shot will place the ball in a good place for the approach to a long narrow green with defending front bunkers to the left and right.
Hole 12 (Par 4)
385
358
331
This hole which is considered by some as the most challenging from the tee appears initially similar to the last hole with trees visually narrowing the drive. Players should note that there is a narrow water hazard on the right to catch erring shots. The approach is over a lake to a generous green so many players decide to lay-up in order to have an easier third stroke onto an up-sloping green. Beware of the slope off the green on the right side towards the water.
Hole 13 (Par 3)
185
165
148
Accuracy and choice of club is required from the tee as a lake has to be carried. Those players preferring to lay-up on the apron of the green have to be wary on the left of a large bunker.
Hole 14 (Par 4)
358
337
286
A straightforward hole but with the need to be on the fairway from the tee as their is water to the right and Out of Bounds to the left. and a bunker to the right. There is also a strategically placed bunker on the left edge of the fairway. The green is again defended by front bunkers left and right and is elevated.
Hole 15 (Par 4)
301
281
261
The challenge of this hole is in the second shot when approaching the green, the front of which is surrounded by eight defending bunkers.
Hole 16 (Par 3)
192
156
128
Accuracy from the tee will be rewarded as the raised green is generous but slopes towards the water. There is Out of Bounds to the left of the green and a water hazard to carry with left and right front defending bunkers.
Hole 17 (Par 5)
476
454
403
A firm drive will the carry the ball over the water hazard onto the fairway but avoiding the forward bunkers seeking the long hitters. The second shot must consider the inviting bunker to the left of the landing area. The approach is to a raised green with two defending bunkers on the left side.
Hole 18 (Par 5)
436
418
386
A finishing hole with a final twist. The tee drive will place the ball short of the water crossing the fairway but beware of the bunker on the right side. The second shot should be a lay-up as the green is an interesting challenge! It is not only raised but it is two tiered. Added to this it is well defended by six bunkers to the front, left and right!
 Golf
Golf 