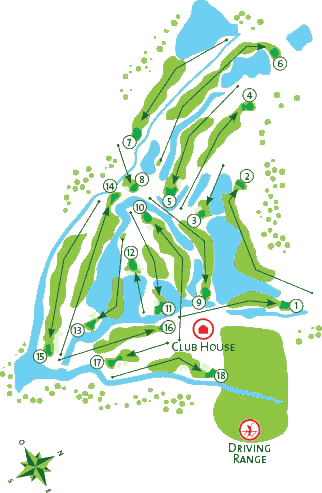
Hole 1 (Par 4)
320
280
240
The first hole is a straight forward with water hazards running down both sides of the fairway. The landing area for the tee drive is quite generous. The green has water on its right side
Hole 2 (Par 5)
485
455
405
The second hole is more demanding with a dogleg to the right. There is ample landing area for the tee drive but the second shot has to be aimed close to the left hand side trees to gain a good approach position.
Hole 3 (Par 3)
170
150
110
A short hole with both sides of the fairway lined with water hazards.
Hole 4 (Par 4)
360
350
285
This hole presents a comfortable par 4 once the tee drive has safely reached the fairway.
Hole 5 (Par 4)
375
350
300
A fifth hole which is slightly longer than the fourth hole. Beware that the green is ringed by a water hazard and with a defending bunker left front.
Hole 6 (Par 4)
515
480
430
The sixth hole is the longest on the course and possibly the most challenging for the average player. It is a dogleg to the right. A short wayward second short through a narrow section of the fairway could land a ball in the lake. Bunkers to the right of the green.
Hole 7 (Par 5)
415
390
305
This seventh hole is straightforward with a tee drive and an approach shot to the green which is defended by a bunker on the right hand side.
Hole 8 (Par 3)
135
120
90
A short hole requiring accuracy and a carefully chosen club for distance. Besides a water hazard running across in front of the green there are two well placed bunkers waiting for errant shots.
Hole 9 (Par 4)
350
325
285
The ninth hole which is back to the clubhouse is a slight right hand dogleg. Water hazards are as usual are nearby but the main one is tucked behind the green to catch too strong an approach shot.
Hole 10 (Par 4)
390
360
300
This hole is a slight dogleg to the left. After clearing the water from the tee the second shot should not provide any difficulty.
Hole 11 (Par 4)
300
285
235
The eleventh hole is not very long but requires accuracy. Ideally the tee drive should land just short of the water hazard in front of the green. The approach shot needs careful club choice and the accuracy to avoid a defending bunker on a green surrounded with water.
Hole 12 (Par 3)
130
115
96
Another short hole but again requiring accuracy in the drive shot with water claiming any landing short of the green.
Hole 13 (Par 4)
295
265
225
The hole has water hazards and a dogleg to the right. Bunkers to the right of the green.
Hole 14 (Par 5)
490
455
410
A hole with a long straight fairway with no hidden challenges.
Hole 15 (Par 5)
545
515
405
This hole requires an accurate second shot to the green as on the left hand side there are a line of three bunkers.
Hole 16 (Par 4)
320
305
240
The sixteenth hole which again has bunkers to the left hand side of the green so the second shot needs accuracy.
Hole 17 (Par 3)
180
160
125
This hole requires good club selection and beware of the three bunkers on the left hand side of the green.
Hole 18 (Par 4)
304
279
222
The final tee drive on the eighteenth has a generous landing area but the approach shot has to consider the large bunker to the left of the green.
