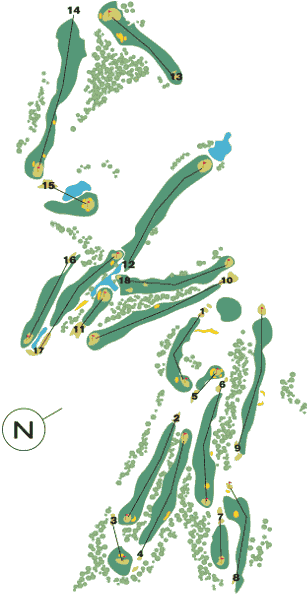
Hole 1 (Par 4)
306
281
241
The opening hole has a wide open fairway but it not only slopes upwards but it also slopes sharply down towards the left. A strong tee drive is required to reach an upper level on the fairway. This will then leave a demanding approach shot up and onto a shallow green which is well defended by four surrounding bunkers. This approach can often be made more difficult as it is directly into the morning sun.
Hole 2 (Par 4)
359
329
313
From the raised tee the drive needs to be to right side of the fairway. Out of Bounds runs down the left side of the fairway. The approach shot is onto a blind long green with bunkers running along its left and right side.
Hole 3 (Par 3)
167
142
124
This attractive hole requires a tee shot across a deep dip onto a raised shallow green with two guarding bunkers front left and right of the apron.
Hole 4 (Par 5)
444
415
376
From the tee there is Out of Bounds following up the right side of the fairway so the line of the drive needs to be kept central as there are two bunkers on the right side of the landing area. Maintain the same line on the second shot leaving an approach to the green.
Hole 5 (Par 3)
112
81
67
A very dramatic short hole where club selection and accuracy are paramount - beware of any cross wind! Depending on which raised tee used by the player the view to the green may not make the player fully aware of the defensive nature of the bunkers surrounding the green. A player must land and then stay on the green or trouble will await.
Hole 6 (Par 4)
320
317
251
From the tee the carrying of the interim rough should not present a problem to a steady player. The fairway slopes to the left and the green is unsighted from the tee. With the approach down to a generous green the shot should bypass the bunker to the right of the apron.
Hole 7 (Par 3)
183
146
117
Pin position and accuracy again are important from the green as the fairway slopes down to the right and the long raised green itself is defended on the right side by a bunker running its generous length.
Hole 8 (Par 4)
292
278
263
A generous fairway leading to a left dogleg The need to carry the trees from the tee is obvious. This will then leave an approach shot down onto a green ringed by three front and left bunkers.
Hole 9 (Par 5)
486
456
349
The tee drive is to carry the valley up onto the level part of the fairway. On this hole the Out of Bounds on the right of the fairway plays its part on the second shot. It may be advisable to consider laying up before the valley with its stream to leave an accurate steep uphill approach to a small green with a guarding bunker front right.
Hole 10 (Par 5)
438
421
393
An interesting hole with a fairway that mainly slopes to the right and with several landing levels. A confident tee drive will leave an uphill second shot onto the apron of the green. Beware as this narrow apron as it is guarded by bunkers left and right. The green which is not over generous has a bunker on its right hand side.
Hole 11 (Par 3)
149
144
109
The drive from tee again requires both a good club selection and accuracy as there is a lake and a defending bunker to carry. Depending on the pin position is safer to aim for the left area of the green. As the bunker almost touches both the water and the front of the green the ideal shot should land and stay on the green.
Hole 12 (Par 5)
421
410
356
On this hole down a reasonably steep sided valley and there is Out of Bounds to note on both sides of the fairway. From the tee the drive should reach or carry the pathway crossing the fairway. The second shot for a strong hitter will take the ball onto the green. However, note that the long narrow green has two defending bunkers on the right and one to the rear.
Hole 13 (Par 4)
397
379
352
The view from the tee is down an attractive valley whilst the design of this long par-4 hole is effectively reduced in its length as it is downhill virtually all the way from the tee. The approach shot is to carry a lateral path before the green but anything too long may end up in the rear bunker.
Hole 14 (Par 4)
385
362
328
Another uncomplicated downhill slope from the tee with two strategic bunkers lining the left side of the fairway. The approach shot is to a long narrow green with a guarding bunker to the front right.
Hole 15 (Par 3)
150
144
120
Once more club selection and accuracy from the tee are required in the shot down to the hole. The green which is wide without much depth has two bunkers on the right hand side. The water is obviously essential to carry.
Hole 16 (Par 4)
287
243
211
A short par-4 downhill hole with a left sloping fairway to a generous landing area for the tee drive. On the long green the pin position will play its part as bunkers surround all sides and water on the left that will await any erring approach shots.
Hole 17 (Par 4)
377
348
307
This hole is regarded by many players as the toughest par-4 on the course. Any player successfully reaching the green with their approach shot deserves a par. From the tee beware of the bunker lying on the right hand side of the fairway. The approach shot has trees lining the left, water and bunkers awaiting on the right of a long green.
Hole 18 (Par 4)
314
295
255
An attractive left dogleg hole to finish the round and end in front of the Club House. The tee drive requires to land at least where the fairway kicks left so the approach shot upwards is to a green that will be visible. A more direct line would be over the top of the tall tree on the left of the fairway. What will not be visible is that the raised green is shallow in depth and its surface could test the player in their putting skills.
 Golf
Golf 