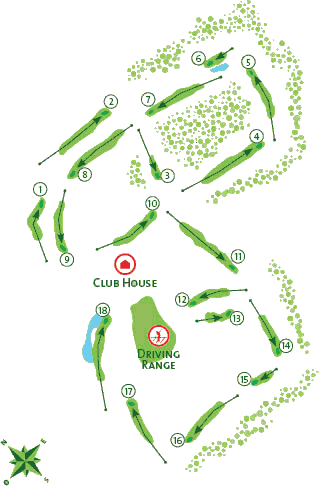
Hole 1 (Par 4)
325
300
250
A short opening hole that is a dogleg right about 100 metres before the green. The right hand side is defended by a copse and a ditch, as well as an Out of Bounds area which is the border of the 9th hole. The bottom of the flag is not visible for the approach shot since the green is elevated. About 35 metres short of the green is a bunker at the foot of the slope and another guards the right front corner of the green.
Hole 2 (Par 4)
391
286
345
From the raised back tee this straight and flattish hole demands two long accurate shots to reach the putting surface. A bunker right and just off the fairway can trap a hooked drive whilst two others are strategically placed at either side of the green.
Hole 3 (Par 3)
203
179
121
The longest par 3 on the course but it is only 121 metres for the ladies. A combination of length and precision is required to end up on the expansive and undulating green. Bunkers are placed each side and the left one being much the larger of the two.
Hole 4 (Par 5)
502
470
404
A hole that is lined with pine-trees from tee to green. A small pond in front of the tee is merely a psychological hazard and keeping to the fairway is the main secret. Mounds to the right of this speedy green can deflect a wayward approach away from that side.
Hole 5 (Par 4)
423
390
325
This hole is Stroke Index 1 and is also a slight dogleg left. Pines encroach on to the edge of the left hand side of the fairway and a long drive can reach a bunker to the right. A dip just before the green may hamper the long approach shot to an elongated green with bunkers on both sides.
Hole 6 (Par 3)
151
137
88
A tester of a short hole as the green is set between a lake on the left and a bunker on the right. The long green which is narrow at the entrance accentuates the need for accuracy from the tee.
Hole 7 (Par 4)
374
347
306
Another challenging though not daunting hole and the last one in amongst the pines. It is again a narrow fairway with some trees that on the left can especially block out an errant tee shot. On the approach the same difficulty arises on the right hand side and the green slopes generally from right to left where two small bunkers lurk in expectation.
Hole 8 (Par 5)
440
436
390
The wide open spaces tempt players to hit out on this hole which is reachable in two shots. However, the drive must be navigated clear of two bunkers lying on the left between 218 and 187 metres from the green. A slight depression before the green can easily prevent a long second shot from rolling on to its surface.
Hole 9 (Par 4)
354
310
269
Long hitters from the tee can clear both left hand side bunkers and set up a birdie chance by leaving a half wedge approach shot. Some danger with trees in the rough and mainly on the right. Also, take care with the undulations on the large upward sloping green.
Hole 10 (Par 4)
339
335
274
A fairly straightforward hole. A drive with draw will steer away from the large bunker just off the fairway on the right, leaving a comfortable iron towards a green guarded by bunkers on either side.
Hole 11 (Par 5)
467
458
382
Tailored hole for the straight hitter that includes three bunkers to trap wayward drives. There are two more on the left side starting 58 metres from the front of the green. This can force players to lay up short to allow for a full shot into the welcoming green that slopes up to the back.
Hole 12 (Par 4)
317
305
238
A fairway wood or a strong mid to short iron shot could be enough to land on the green. Be careful with putts from the back down to the front as this green tends to be fast and has some subtle breaks.
Hole 13 (Par 3)
188
142
95
It is advisable not to under club on this short hole in order to clear the large bunker that fronts the green which has its widest portion up towards the back. The narrow entrance to the sloping green is protected on the right by another bunker.
Hole 14 (Par 4)
334
312
258
On this hole it is an advantage to clear both the two bunkers on either side of the fairway between 80 and 100 metres from the green as the approach must be played with a high lofted iron. This is because the green is awkwardly offset to the right and the bunkers on both sides of present a tight target.
Hole 15 (Par 3)
122
119
101
A short hole to a green surrounded protectively by five bunkers presenting an interesting challenge and demanding accuracy from the tee. Most players are content with two putts on the treacherous two-tiered putting surface which slopes from top right to bottom left.
Hole 16 (Par 4)
378
371
304
This hole can cause problems to anyone playing it for the first time. The green is not visible from the tee as the fairway rises steadily for the first 230 metres and then slopes downwards. Aim to land the drive in the centre of the triangle formed by three bunkers just off the fairway. The gently undulating green is protected by three more bunkers but the narrow entrance will test your long approach play especially when the shot is blind.
Hole 17 (Par 4)
345
333
250
A large lake on the right or the two bunkers lying left on the opposite side can attract an off-line drive on this hole. The green which is 41 metres from front to back is within easy reach of an uphill 9 iron or wedge approach.
Hole 18 (Par 5)
504
454
367
A good challenging closing hole where this is little margin for error off the tee. Out of Bounds is to the right and a tight landing area lies between a long lake left and a bunker at the edge of the fairway. The second shot must stay right to keep away from the water hazard which extends close to the left hand side of the green. An iron shot is recommended until one can see the lie of the land and then it is a wedge approach to get home.
 Golf
Golf 